Showing posts with label make. Show all posts

Make Your Windows 7 Genuine by Command Prompt Computer Tips

Make Your Windows 7 Genuine by Command Prompt: Computer Tips


How to make your windows 7 genuine by command prompt. So, follow my image instruction ...Lets Go............

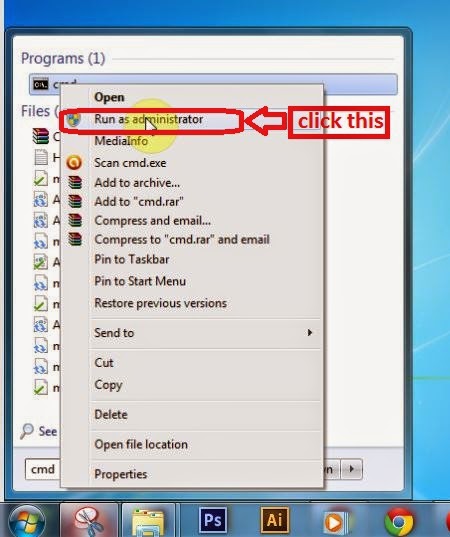
# 1st step: Go to start menu and type cmd and right click on the cmd icon

Windows 7 Genuine1


# Step 2: then click in "Run as administrator" then press ok
 Windows 7 Genuine2


# Step 3: Type this command " SLMGR -REARM " then press ok

 Windows 7 Genuine3

# Step 4:  Wait a seconds
 Windows 7 Genuine4


# Step 5: then successfully complete this task and restart your computer and get your windows genuine,
 Windows 7 Genuine5


Read More..

How to make a Computer Game

Read More..

Robot Servants Are Going to Make Your Life Easy

...Then Theyll Ruin It.

Well thats the opinion of Evan Selinger in a recent article for Wired. JIBO, the "worlds first family robot" is heralding an age where robots or digital personal assistants anticipate our needs and perhaps even start making decisions for us. Thats where Selinger believes the danger lies. Watch the JIBO promotional video below and make up your mind.


from The Universal Machine http://universal-machine.blogspot.com/

IFTTT

Put the internet to work for you.

Turn off or edit this Recipe

Read More..

Manually make fast your Pc without using any third party software computer tips

Manually make fast your Pc without using any third party software :)computer tips


You can easily make your PC fast  following natural way. Watch my video tutorial.


Read More..

10 awesome internet hacks to make your life better

Well Im not  sure that they are "awesome" but they are potentially useful, interesting or just fun. The Guardian recently published "10 awesome internet hacks to make your life better" that range from: how to log out of Facebook remotely if you left it running on a friends or relatives computer, how to bring up an emoji keyboard on your Mac or PC, and how to watch YouTube in slow motion. 

from The Universal Machine http://universal-machine.blogspot.com/

IFTTT

Put the internet to work for you.

Turn off or edit this Recipe

Read More..

Make Your Websites More Accessible to More Users with Introduction to Web Accessibility


Cross-posted with Google Developers Blog

You work hard to build clean, intuitive websites. Traffic is high and still climbing, and your website provides a great user experience for all your users, right? Now close your eyes. Is your website easily navigable? According to the World Health Organization, 285 million people are visually impaired. That’s more than the populations of England, Germany, and Japan combined!

As the web has continued to evolve, websites have become more interactive and complex, and this has led to a reduction in accessibility for some users. Fortunately, there are some simple techniques you can employ to make your websites more accessible to blind and low-vision users and increase your potential audience. Introduction to Web Accessibility is Google’s online course that helps you do just that.


You’ll learn to make easy accessibility updates, starting with your HTML structure, without breaking code or sacrificing a beautiful user experience. You’ll also learn tips and tricks to inspect the accessibility of your websites using Google Chrome extensions. Introduction to Web Accessibility runs with support from Google content experts from September 17th - 30th, and is recommended for developers with basic familiarity with HTML, JavaScript, and CSS.

There’s a lot to learn in the realm of web accessibility, and a lot of work to be done to ensure users aren’t excluded from being able to easily navigate the web. By introducing fundamental tips to improve web usage for users with visual impairments, Introduction to Web Accessibility is a starting point to learn how to build accessibility features into your code. Registration is now open, so sign up today and help push the web toward becoming truly universally accessible.
Read More..

Make Mozilla Firefox load websites faster

Speedup Mozilla Firefox
If you think that your firefox is slow you can try the following tweak to fasten it.

Note:- Try this only if you are an expert.
  • Type “about:config” into the address bar and hit enter.
  • A warning sign will appear, click continue.
  • Scroll to the entry- "network.http.pipelining" - Change the value to "True" by double-clicking it.
  • Scroll to the entry- "network.http.proxy.pipelining" - Change the value to "True" by double-clicking it.
  • Scroll to the entry- "network.http.pipelining.maxrequests" - Change the value to "8" by double-clicking it. Not more than 8, because 8 is the max value allowed.
  • Now, right-click anywhere and select New >> Integer., name it “nglayout.initialpaint.delay” and set its value to “0?. This value is the amount of time the browser waits before it acts on information it receives.
Now you might feel the difference.
Read More..

How to Make RSSfeedreader PHP script Work on Your Server

Today, I am pleased to announce that the RSSfeedreader website is working again.

This is how you get your site to run PHP files created by RSSfeedreader:


PART ONE

Putting Info into the .htaccess file

Open your FTP program.

go to the main folder "/public_html/"

a) Right click on ".htaccess" and click "edit". The file will open straight away or you may have to click "overwrite" depending on your FTP program.

b) If you dont see an ".htaccess" file, create it by opening notepad.

Now, in both instances a) and b) above you will have notepad open.

Some of you will see

AddHandler server-parsed .htm
AddHandler server-parsed .html"

already there. That is okay.

This is the important part.

Make sure all of the following is in that notepad page:

AddHandler server-parsed .htm
AddHandler server-parsed .html
suPHP_ConfigPath /home/loginname/public_html/

The "loginname" is the name you enter into your FTP program (with a password of course but no password in this instance) to be able to put files onto your server.

Save the notepad page with this name ".htaccess.php"
It will save as "htaccess.php.txt but you will not be able to remove the "txt" on your computer because the file name begins with a "."

Upload the ".htaccess.php.txt" file to the "/public_html/" directory.
Delete the old ".htaccess,php" if you already have it.
Right click on the ".htaccess.php.txt" file.
Click "rename"
Delete the ".txt" part of the name.
The FTP program may ask if it is alright to change it, but click "OK".


PART TWO

Creating the php.ini file

Open notepad. Write this, or copy it, into the notepad page.

register_globals = On ;
allow_url_include = On ;

Save it as "php.ini"

It will save as "php.ini.txt"

Upload the "php.ini.txt" file to the "/public_html/" directory.
Right click on the "php.ini.txt" file.
Click "rename"
Delete the ".txt" part of the name.
The FTP program may ask if it is alright to change it, but click "OK".

If you already have a "php.ini" Right click on it and put the extra code in it using notepad.
Delete the old ".htaccess,php"
Upload the "php.ini.txt" file to the "/public_html/" directory.
Right click on the "php.ini.txt" file.
Click "rename"
Delete the ".txt" part of the name.
The FTP program may ask if it is alright to change it, but click "OK".


USING THE RSSFEEDREADER WEBSITE

Go to the site. Register your name, email and website address.

Look in your email.

Login in to the RSSfeedreader site.

Enter the URL of your desired news feed after the "http://"

Make sure you put the "www." in, for example http://www.feeds.news.com.au/public/rss/2.0/news_mostpopular_topstories_403.xml

if the "www." address doesnt work try,

http://feeds.news.com.au/public/rss/2.0/news_mostpopular_topstories_403.xml

The feed URLs can be really fussy about the "www." Some need it, some dont.


Enter the information on how you want the feed to look.

For page width enter the width In "Feed Width"

Dont bother about "Choose New Page Options"

Click "get RSS Feed"

Copy the PHP script.

Paste it into a notepad page.


Saving the PHP file

Save it as "rssfeedyourfilename.php" into the "/public_html/" directory with your FTP program.

Right click on the file, choose rename, and remove the ".txt"

Enter the "include virtual" code,

as RSSfeedreader info advises, into your website html code at the position in the page where you want it.

Save the html. Upload it to the "/public_html" directory on your server.

Finished!

. . . . . . . . . . . . .
Read More..

make a snow effect on the mouse cursor on the blog


UPDATE: I updated some of my posts, this post I update 17+ Featured Content Slider for Blogger Using jQuery ..........


STEP #1
Log in to Blogger, go to Design -> 


page-elements

Add a Gadget of HTML/JavaScript type. 


image


4. Now Click On Save JavaScript You are done.


<a href="http://24work.blogspot.com" target="_blank" title="Blogger Widgets"><img src="http://safir85.ucoz.com/24work-blogspot/cursor-24work-10.png" border="0" alt="Blogger Widgets" style="position:absolute; top: 0px; right: 0px;" /></a><script type="text/javascript">

// <![CDATA[

var colour="black";

var sparkles=100;


var x=ox=400;

var y=oy=300;

var swide=800;

var shigh=600;

var sleft=sdown=0;

var tiny=new Array();

var star=new Array();

var starv=new Array();

var starx=new Array();

var stary=new Array();

var tinyx=new Array();

var tinyy=new Array();

var tinyv=new Array();

window.onload=function() { if (document.getElementById) {

var i, rats, rlef, rdow;

for (var i=0; i<sparkles; i++) {

var rats=createDiv(3, 3);

rats.style.visibility="hidden";

document.body.appendChild(tiny[i]=rats);

starv[i]=0;

tinyv[i]=0;

var rats=createDiv(5, 5);

rats.style.backgroundColor="transparent";

rats.style.visibility="hidden";

var rlef=createDiv(1, 5);

var rdow=createDiv(5, 1);

rats.appendChild(rlef);

rats.appendChild(rdow);

rlef.style.top="3px";

rlef.style.left="0px";

rdow.style.top="0px";

rdow.style.left="3px";

document.body.appendChild(star[i]=rats);

}

set_width();

sparkle();

}}

function sparkle() {

var c;

if (x!=ox || y!=oy) {

ox=x;

oy=y;

for (c=0; c<sparkles; c++) if (!starv[c]) {

star[c].style.left=(starx[c]=x)+"px";


star[c].style.top=(stary[c]=y)+"px";

star[c].style.clip="rect(0px, 5px, 5px, 0px)";

star[c].style.visibility="visible";

starv[c]=50;

break;

}

}

for (c=0; c<sparkles; c++) {

if (starv[c]) update_star(c);

if (tinyv[c]) update_tiny(c);

}

setTimeout("sparkle()", 40);

}

function update_star(i) {

if (--starv[i]==25) star[i].style.clip="rect(1px, 4px, 4px, 1px)";

if (starv[i]) {

stary[i]+=1+Math.random()*3;

if (stary[i]<shigh+sdown) {

star[i].style.top=stary[i]+"px";

starx[i]+=(i%5-2)/5;

star[i].style.left=starx[i]+"px";

}

else {

star[i].style.visibility="hidden";

starv[i]=0;

return;

}


}

else {

tinyv[i]=50;

tiny[i].style.top=(tinyy[i]=stary[i])+"px";

tiny[i].style.left=(tinyx[i]=starx[i])+"px";

tiny[i].style.width="2px";

tiny[i].style.height="2px";

star[i].style.visibility="hidden";

tiny[i].style.visibility="visible"

}

}

function update_tiny(i) {

if (--tinyv[i]==25) {

tiny[i].style.width="1px";

tiny[i].style.height="1px";

}

if (tinyv[i]) {

tinyy[i]+=1+Math.random()*3;

if (tinyy[i]<shigh+sdown) {

tiny[i].style.top=tinyy[i]+"px";

tinyx[i]+=(i%5-2)/5;

tiny[i].style.left=tinyx[i]+"px";

}

else {


tiny[i].style.visibility="hidden";

tinyv[i]=0;

return;

}

}

else tiny[i].style.visibility="hidden";

}

document.onmousemove=mouse;

function mouse(e) {

set_scroll();

y=(e)?e.pageY:event.y+sdown;

x=(e)?e.pageX:event.x+sleft;

}

function set_scroll() {

if (typeof(self.pageYOffset)=="number") {

sdown=self.pageYOffset;

sleft=self.pageXOffset;

}

else if (document.body.scrollTop || document.body.scrollLeft) {

sdown=document.body.scrollTop;

sleft=document.body.scrollLeft;

}

else if (document.documentElement && (document.documentElement.scrollTop || document.documentElement.scrollLeft)) {

sleft=document.documentElement.scrollLeft;

sdown=document.documentElement.scrollTop;

}

else {

sdown=0;

sleft=0;

}

}

window.onresize=set_width;

function set_width() {

if (typeof(self.innerWidth)=="number") {

swide=self.innerWidth;

shigh=self.innerHeight;

}

else if (document.documentElement && document.documentElement.clientWidth) {

swide=document.documentElement.clientWidth;

shigh=document.documentElement.clientHeight;

}

else if (document.body.clientWidth) {

swide=document.body.clientWidth;

shigh=document.body.clientHeight;

}

}

function createDiv(height, width) {

var div=document.createElement("div");

div.style.position="absolute";

div.style.height=height+"px";

div.style.width=width+"px";

div.style.overflow="hidden";

div.style.backgroundColor=colour;

return (div);

}

// ]]>

</script>


And now click Save


# you can change :


var colour="black";


  • Hex Color Code Chart and Generator
  • color charts
  • Html Color Codes Generator


UPDATE: I updated some of my posts, this post I update How To Add Snow Effect On The Blogger Mouse Cursor Area ..........
Read More..

How to Make a Template in Apple Mail

Since the release of Mac OS X, Apple has included Mail to help its users manage different email accounts. If you frequently need to send (and resend) similar emails, creating templates can be an excellent time-saving technique. Templates are called "Stationery" in Mail, and they allow you to save text and graphic layouts. Once saved, these stationery files may be adjusted to your needs before being sent out again and again.

Instructions

Things Youll Need:

  • Mac OS X

    Creating Stationery

  1. Step 1

    Open Mail, located on the Dock or in the "Applications" folder.

  2. Step 2

    Create a new message by clicking the "New Message" button.

  3. Step 3

    Insert desired text and graphics.

  4. Step 4

    Navigate to "File" menu and select "Save as Stationery."

Read More..