Showing posts with label 7. Show all posts

Enable DMA in Windows XP Vista and Windows 7 to speed up the system

Direct memory access (DMA) is a feature of modern computers and microprocessors that allows certain hardware subsystems within the computer to access system memory for reading and/or writing independently of the central processing unit.
DMA is used for transferring data between the local memory and the main memory. Computers that have DMA channels can transfer data to and from devices with much less CPU overhead than computers without a DMA channel.

This is especially useful in real-time computing applications where not stalling behind concurrent operations is critical. Another and related application area is various forms of stream processing where it is essential to have data processing and transfer in parallel, in order to achieve sufficient throughput.
Now, know how to Enable Direct Memory Access (DMA) in order to speed up your system.

You must be logged on as an administrator to perform these steps.

Direct memory access (DMA) is usually turned on by default for devices such as hard disks and CD or DVD drives that support DMA. However, you might need to turn on DMA manually if the device was improperly installed or if a system error occurred. Perform the following steps to do this.

First Open Device Manager.
  • Right-click on My Computer, select Properties
  • Select the Hardware tab
  • Click the Device Manager button
For Windows XP
  1. Double-click IDE/ATAPI controllers
  2. Double-click on the Primary IDE Channel
  3. Click on the Advanced Settings tab (as shown in figure) The tab may or may not be available for each option. It is only available in Primary and Secondary Channels.
  4. Set the Transfer Mode to "DMA if Available" both for Device 1 and 0
  5. Click OK
  6. Perform the same operation for other items in the list, if applicable.
For Windows Vista and Windows 7
  1. In the left pane, click the plus sign next to IDE ATA/ATAPI controllers to expand it.
  2. For each icon that has the word Channel as part of its label, right-click the icon, and then click Properties.
  3. Click the Advanced Settings tab, and then, under Device Properties, select the Enable DMA check box.
  4. Click OK.
Read More..

Make Your Windows 7 Genuine by Command Prompt Computer Tips

Make Your Windows 7 Genuine by Command Prompt: Computer Tips


How to make your windows 7 genuine by command prompt. So, follow my image instruction ...Lets Go............

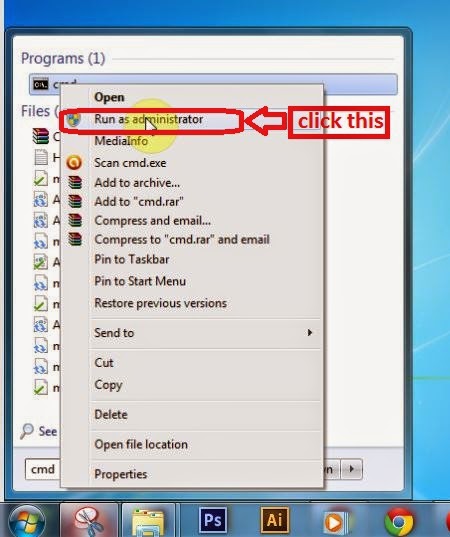
# 1st step: Go to start menu and type cmd and right click on the cmd icon

Windows 7 Genuine1


# Step 2: then click in "Run as administrator" then press ok
 Windows 7 Genuine2


# Step 3: Type this command " SLMGR -REARM " then press ok

 Windows 7 Genuine3

# Step 4:  Wait a seconds
 Windows 7 Genuine4


# Step 5: then successfully complete this task and restart your computer and get your windows genuine,
 Windows 7 Genuine5


Read More..

Download Free 140 Page Windows 7 Product Guide from Microsoft

Microsoft Windows 7 has not only enhanced its software application but also marketing and customer services. Though resting having established its dominance in computer operating systems, Microsoft shows that it is not on its laurels or planning to relax its grip on the market. Apart from Microsoft Answers, the Q&A technical support launched in December 2008, and Windows 7 Solution Center, Microsoft is offering the new Windows 7 Product Guide which can be downloaded for free.

The 140-page overview provides a detailed and comprehensive guide to users on how to make full use of Windows 7. The product guide is organized into three sections – Introduction , Windows 7 for You, and Windows 7 for IT Professionals. It also has an overview of the Microsoft Desktop Optimization Pack which explains how companies can use the applications to manage and optimize their desktop functions.

While the Product Guide serves as a manual, the Windows 7 Solution Center offers troubleshooting tips to fix problems. The tech support website is divided into several categories including installation, upgrading, activation, performance, safety, Internet Explorer, entertainment, etc. Although the features and functions of the latest operating systems get increasingly more sophisticated and advanced, users have no excuse to reject Windows 7 due to ignorance or the lack of familiarity and support.

Download Windows 7 Product Guide from Microsoft Download Centre

Read More..

Trick to Speed Up Windows 7 and Vista Boot Up

Speed Up Windows 7 and Vista Boot Up
There are many ways to decrease booting time and speed up start, such as using third party programs such as Startup Manager to manage programs running automatically. Windows 7 and Windows Vista users running dual-core, quad-core or other multi-core or multi-processors computer can try the following trick to make Windows boots faster.
  • Press Win + R to open “Run” dialog window
  • Type MSConfig into the text box after “Open”.
  • Go to Boot tab.
  • For dual-boot or multi-boot system, make sure that the operating system to make the change is selected.
  • Click on Advanced options button.Speed Up Windows 7 and Vista Boot Up
  • Tick the check box for Number of processors, and then select the maximum number count of CPU core processors value from the drop down list.
  • Click OK twice to exit System Configuration.
  • Restart computer.
Once enabled, Windows operating system will use all available (or selected number of) processor cores to run the boot up algorithms, and this potentially make the startup speedier and faster, with less waiting time on black screen and logon screen. User with single core computer unlikely to find the trick useful though.
Read More..

Largest collection of Google Logos on the web Set 7

Set1 Set2 Set3 Set4 Set5 Set6 Set7 Set8 Set9 Set10

Largest Collection of Google Logos


Google Logos 249Google Logos 251Google Logos 254


Google Logos 255Google Logos 256Google Logos 258


Google Logos 259Google Logos 260Google Logos 262


Google Logos 264Google Logos 266Google Logos 268


Google Logos 270Google Logos 271Google Logos 272


Google Logos 273Google Logos 274Google Logos 277

Google Logos 276Google Logos 278Google Logos 280


Google Logos 281Google Logos 282Google Logos 284


Google Logos 285Google Logos 287Google Logos 289
Google Logos 290Google Logos 292Google Logos 294


Google Logos 296Google Logos 297Google Logos 298

Set1 Set2 Set3 Set4 Set5 Set6 Set7 Set8 Set9 Set10

Read More..

How to allow users to Run only specified programs in Windows 7


You can allow users to run only specified programs in Windows 7 operating systems. It is up to you if you want your shared computer to allow users to run only specified programs in Windows 7. A shared computer in an office, for example, can be set in the same way if the company does not want the employees to run all types of programs. You can allow the users to run only specified programs in Windows 7 by using the Local Group Policy. However, you cannot do this in the Home editions of Windows 7 as it does not provide the Local Group Policy Editor.
Click on the Start button.

Type “gpedit.msc” in the search box of the Start menu and press the Enter button on the keyboard.
Local Group Policy Editor will open. Scroll down to “User Configuration”, “Administrative Templates” and then “System” on the left hand side of the window pane.
On the right hand side of the window, under “Setting”, navigate and double-click on “Run only specified Windows applications”.


Select Enabled from the window.
Click on “Show” under Options. 


The Show Contents window pane will appear. Here you can type the applications you want to let the users run.
After you are done, click on the OK button.
Close the Local Group Policy Editor.


After this, if someone attempts to run an app which was not specified by you, he will get this error message:


This feature to allow users to run only specified programs in Windows 7 is the best at preventing the users from accessing applications you don’t want them to use on a particular computer.

Read More..

Windows 7 Hidden Theme

Computer Tips
 computer theme

windows 7- as soon as the user knows that windows 7- This is the default theme that already.Under the theme of Windows 7 - the custom wallpaper, sounds, icons, task-bar, etc. are arranged. A certain number of the theme you want to use any of the themes that are downloaded from the Internet. But you know your being aware of the location of the five theme categories are concealing your Windows PC! Yes, absolutely the truth. Now just a little  pain in my Windows 7 PC in 5minutes time. From the start  in the search bar: Windows Globalization MCT write.Now press  Enter. Then open a new window.“ll see five folders in a new window.Now that MCT-AU folder into the folder Theme - waited in AU. Theme-click Windows 7 - The theme will be installed in Australia. Similarly, one by one, MCT-CA, MCT-GB, MCT-US, MCT
-ZA folders respectively entered into the Theme folder CA. theme, GB. Theme, US. Theme and ZA.Theme folders click will install the remaining four themes on your PC. This theme is the theme of four in Canada, the United Kingdom, the United States and South Africa.
 
Read More..

How to Turn On or Enable Hibernation in Windows 7

Note Windows 7 doesnt support Hibernate on System with Ram of 4GB or more.

To Turn On or Enable Hibernation.
  1. Click on Start.
  2. Type cmd. Now instead of pressing Enter, press Ctrl+Shift+Enter to run cmd with administrator rights.
  3. or Browse to C:WindowsSystem32
  4. Right Click on cmd.exe and select Run as Administrator
  5. Type powercfg /hibernate on and hit enter.
  6. Now go to Control Panel >> System and Security >> Power Options.
  7. Click on Change plan settings link of the active power plan.
  8. Click on Change advanced power settings link.
  9. Expand the Sleep tree.
  10. In the drop down box of Allow Hybrid Sleep, select Off as new setting to disable and turn off Hybrid Sleep.

To Turn off or Disable Hibernate.
  1. Click on Start.
  2. Type cmd. Now instead of pressing Enter, press Ctrl+Shift+Enter to run cmd with administrator rights.
  3. or Browse to C:WindowsSystem32
  4. Right Click on cmd.exe and select Run as Administrator
  5. Type powercfg /hibernate off and hit enter.

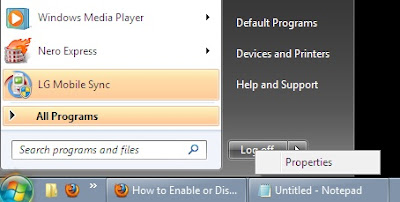
Now, to Set the power button option as Hibernate,

  • Click on Start.
  • Right-Click on the Power Button.

Enable Hibernate in Windows 7
  • Click on Properties.
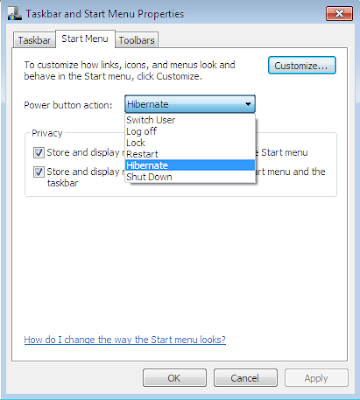
  • Drop-down the Power Button Action Box.

Enable Hibernate in Windows 7
  • Select Hibernate.
  • Click on Apply and then Click on OK.
Read More..